Posts

Showing posts with the label #slimlinecards

Slimline Heart Shaker Card + Tags

Image
Hello crafty friends! It's February and LOVE is the air, so today I'm sharing a love theme slimline shaker card featuring these cuties from the Otter Side stamp set. Now, let's get started! First, I stamped the images from the Otter Side , Yappy Happy Mai l and Beary Big Heart using  Memento Tuxedo Black Ink Pad . I colored them using Copic markers and fussy cut them out. (coordinating dies available here ). For the back panel, I took a white card stock and cut it using the scalloped rectangle die from the Slimline Pull Tab Die . Next for the front panel, I took another white card stock and cut it using the second largest rectangle die from the Stitched Slimline Trio Die . I then cut the panel again using the second smallest heart die from the Stitched Hearts Dies to create three heart aperture for the shaker. (Tip: Keep the heart pieces because we are going to use it later for the tags.)  I ink blended both panels using Distress Oxide Salted Ocean, Salvaged Patina, Peacoc...

Happy Howl-O-Ween Slimline Shaker Card

Image
Hi everyone! I have a fun Halloween themed shaker card to share with you today. It's featuring these adorable pups from the Who Let The Dogs Out , Yappy Happy Mail and Rescue Dogs stamp sets. To start, I stamped all the images using Memento Tuxedo Black Ink Pad , colored them using Copic markers and fussy cut them out (coordinating die available here ). I took a piece of white card stock and ran it through my die cut machine using the Slimline Quartet Dies . I ink blended Distress Oxide Black Soot, Seedless Preserves, Wilted Violet, Worn Lipstick and Dried Marigold. I took another piece of white card stock and ink blended Distress Oxide using the same combination as I mentioned above and used it as my back panel. Next, I adhered a piece of acetate sheet to my front panel using double sided tape and then adhered the 3mm deep foam tape . I filled it with the shaker elements and then assembled all the panels together. I heat embossed the sentiment on a black card stock using white e...

Cute as A Button!

Image
Hello crafty friends! It's  Lidya  here today sharing a cute and fun-filled slimline shaker card featuring the new Oh Baby! stamp set from #merakiversary release.  To start, I took a white card stock, ran it through my die cut machine using the  View from My Window die  and ink blended Distress Oxide Blueprint Sketch , Shaded Lilac and Spun Sugar.  I then took another white card stock and using the same combination of Distress Oxide as I mentioned above and us it as the card base. I splattered both of the card stock using white acrylic paint. I heat-embossed the sentiment onto my front panel using red embossing powder.  I die cut a foam sheet using the  View from My Window die  and put it aside. Next, I adhered a piece of acetate sheet onto the front panel,  adhered my foam sheet onto the acetate sheet and filled it with shaker element. I then adhered it onto the card base.  To decorate the front panel, I stamped all the imag...

I Carrot Wait to See You!!

Image
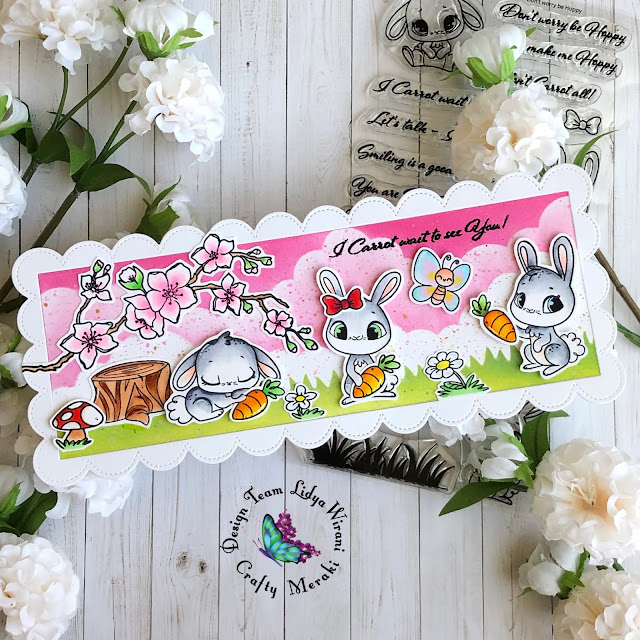
Hello friends!  Have you seen the amazing new products from #merakiversary NEW RELEASE? You can check them out  here ! Today, I'm sharing a slimline card featuring the brand new Don't Worry Be Hoppy stamp set . I absolutely adore these bunnies, they are just the cutest! To start, I cut a white card stock using the Timeless Frames Slimline Dies , used My Favorite Things Rolling Clouds Stencil and inked Distress Oxide Picked Raspberry and Spun Sugar. I then splattered it using gold watercolor paint. I used grass stencil and applied Distress Oxide Twisted Citron and Mowed Lawn.  I heat-embossed the sentiments onto the background panel using clear ink pad and black embossing powder. Next, I stamped all the images from Year of The Ox , To-tail-ly Awesome and Don't Worry Be Hoppy stamp set using Memento Tuxedo Black Ink Pad. I colored them using Copic markers and fussy cut them out.  Finally, I adhered the images using glue and popping a few up using foam tape for some ...

Sweet and Fun Interactive Scalloped Slimline Card

Image
Hello friends! Lidya here today sharing a sweet and fun interactive slimline card featuring some awesome products from the new release.  If you ask me which one is my favorite die from the new release, I would answer: "How can I choose?! They are all AMAZING!"😄 But if I really MUST choose one, I would say my favorite is the sweet scalloped slimline dies . I'm a sucker for all things scalloped and the word die "mmwaah" really stole my heart.  I started by stamping all the images from Quill You Be Mine stamp set using Memento Tuxedo Black Ink Pad. I colored them using Copic Markers and fussy cut them out (coordinating dies available here). I added some highlights using white gel pen.  Next, I cut a white card stock using the second largest scalloped dies from the Sweet Scalloped Slimline Dies and ink blended Distress Oxide Wilted Violet and Shaded Lilac. I then used the Head in The Clouds stencil and applied white pigment ink.   I cut a white card stock using ...

Oh Happy Day!

Image
Hello crafty friends! It's Lidya here today sharing a cute and fun-filled slimline card featuring these cuties from the To-tail-ly Awesome stamp set . I've used this set several times, because I truly adore these foxes, they are just the cutest! To start, I took a white card stock and ran it through my die cut machine using Timeless Slimline Frame Die and ink blended Distress Oxide Wilted Violet , Picked Raspberry , Spun Sugar and Dried Marigold . I then splattered it with gold shimmer paint and white watercolor paint. I created the mirror image of the fox using My Favorite Things mirror image stamp . I used my Misti Stamp Tool to transfer fox image to the MFT mirror image stamp and then placed a piece of white card stock face down to the mirror image stamp, and carefully pressed it onto the mirror image stamp to get a good impression. I lifted the paper and voila! I had my mirror image. I then colored all the images using Copic Markers and fussy cut them out.  Next, I heat-em...

Sending Some KOALA-ty Hugs

Image
Hello crafty friends! It's  Lidya  here today sharing a sweet slimline card featuring these adorable koalas from My Favorite Things Koala-ty Time  stamp set.   For my card panel, I die-cut a white card stock using View From My Window die from Crafty Meraki. I ink blended Distress Oxide Spun Sugar, Speckled Egg and Stormy Sky .  Next, I placed Heffy Doodle Twinkle Twinkle stencil and applied Nuvo Moonstone Glimmer Paste. I love how it add fun sparkle to the card base.  I stamped all the images using Memento Tuxedo Black Ink pad, colored them using Copic markers and fussy cut them out. I added some highlights using white gel pen. I took a red card stock and die-cut the word hugs from the Love Slimline Tag die . I heat-embossed the sentiment on red card stock using white embossing powder. Finally, I adhered all the images, the sentiments and the die-cut word  to the card panel using liquid glue and double sided tape. Thank you so muc...

Crafty Meraki Collaboration with Brutus Monroe

Image
Hello friends!! I'm super excited to share with you three fun projects that I've created for Crafty Meraki awesome collaboration with Brutus Monroe .  For the first one, I created a slimline card using Crafty Meraki Timeless Frames Slimline die , To-tail-ly Awesome stamp set and Pixie Perfect stamp set . I chose to combine it with the mice from Brutus Monroe Mouse Friends stamp set, look how adorable those mice are. I  heat embossed the sentiment from Valentine stamp set and I think it's just perfect for this card. For the second project, I created a card using the die-cut word LOVE and hugs from Crafty Meraki Love Slimline Tag Die . This die is awesome, I love how you can create a slimline tag using the main die, but you can use the words for cards or any other crafting project. This die really is  a multi-purpose must-have item in your crafty stash! I used the adorable owls from Crafty Meraki Owl Yours stamp set and I combined it with the cute owl from Brutus Mon...

I'm Here Fur You

Image
Hello friends! It's  Lidya  sharing a fun slimline card for you today! I enjoyed using the adorable foxes from  To-tail-ly Awesome so much last time that I decided to bring them back for today's card.  I started by stamping all the images from the  To-tail-ly Awesome , Valentine , and Year of The Ox using Memento Tuxedo Black Ink Pad, I colored them using Copic markers and fussy cut them out.  Next, I die-cut a white card stock using Timeless Frame Slimline Dies and ink blended Distress Oxide Blueprint Sketch , Mermaid Lagoon , Miled Lavender and Shabby Shutters . I then splattered the background using white watercolor paint, gold shimmer paint, Distress Oxide Mermaid Lagoon and Festive Berries .  I heat-embossed the sentiment using black embossing powder onto the card base. Finally, I adhered all the images using glue and foam tape.  Thank you so much for stopping by today! Visit Crafty Meraki  here  to see all their amazing product...

You're The Sweetest

Image
Hello crafty friends! It's Lidya here and I'm back to share another card with you in my Let's Mix It Up series. I love unicorns and I think these unicorns from the Fluffy Puffy Unicorns stamp set are one of the cutest I've ever seen. When I was a little girl, I always imagined unicorns live in a beautiful pastel color castle with yummy sweet stuff everywhere. So today I'm sharing my childhood imagination with you in a form of an adorable card, LOL! I started by stamping all the images from Fluffy Puffy Unicorns, Sweet Stuff, Happily Ever Crafter and Treat Yo' self using Memento Tuxedo Black Ink Pad. I colored them using Copic markers and added some highlights using white gel pen.  Next, I took two white card stock and ran it through my die cut machine using the scalloped rectangle frame from Slimline Pull Tab Die. I then ink blended one of the white card stock using Distress Oxide Seedless Preserves, Picked Raspberry and Spun Sugar. This is going to be my card ...

Mini Slimline Shaker Birthday Card

Image
Hello friends! Happy Hump Day! Mini slimline card is trending right now and I'm sharing my very first mini slimline card today. I used mini diamond wire & wood grain frame die from Kat Scrappiness. I've heard people raving about their dies, and after tried it myself, I have to say I'm so impressed with the quality.  To start, I took a white card stock and ran it through my die cut machine using the mini slimline die, then I applied Distress Oxide Spun Sugar. Next, I adhered a piece of acetate sheet onto the front panel, and filled it with the shaker element.  I cut a 5 3/4" X 3 1/8" pink card stock and used it as my back panel. I used Heffy Doodle foam tape to assemble the panels together for this card and I highly recommend using their foam tape. The thickness is great for shaker card, all the shaker element can easily move around.  I  stamped the adorable koala from Pretty Pink Posh Party Friends stamp set, colored them using Copic markers and fussy cut t...